
USER GUIDE
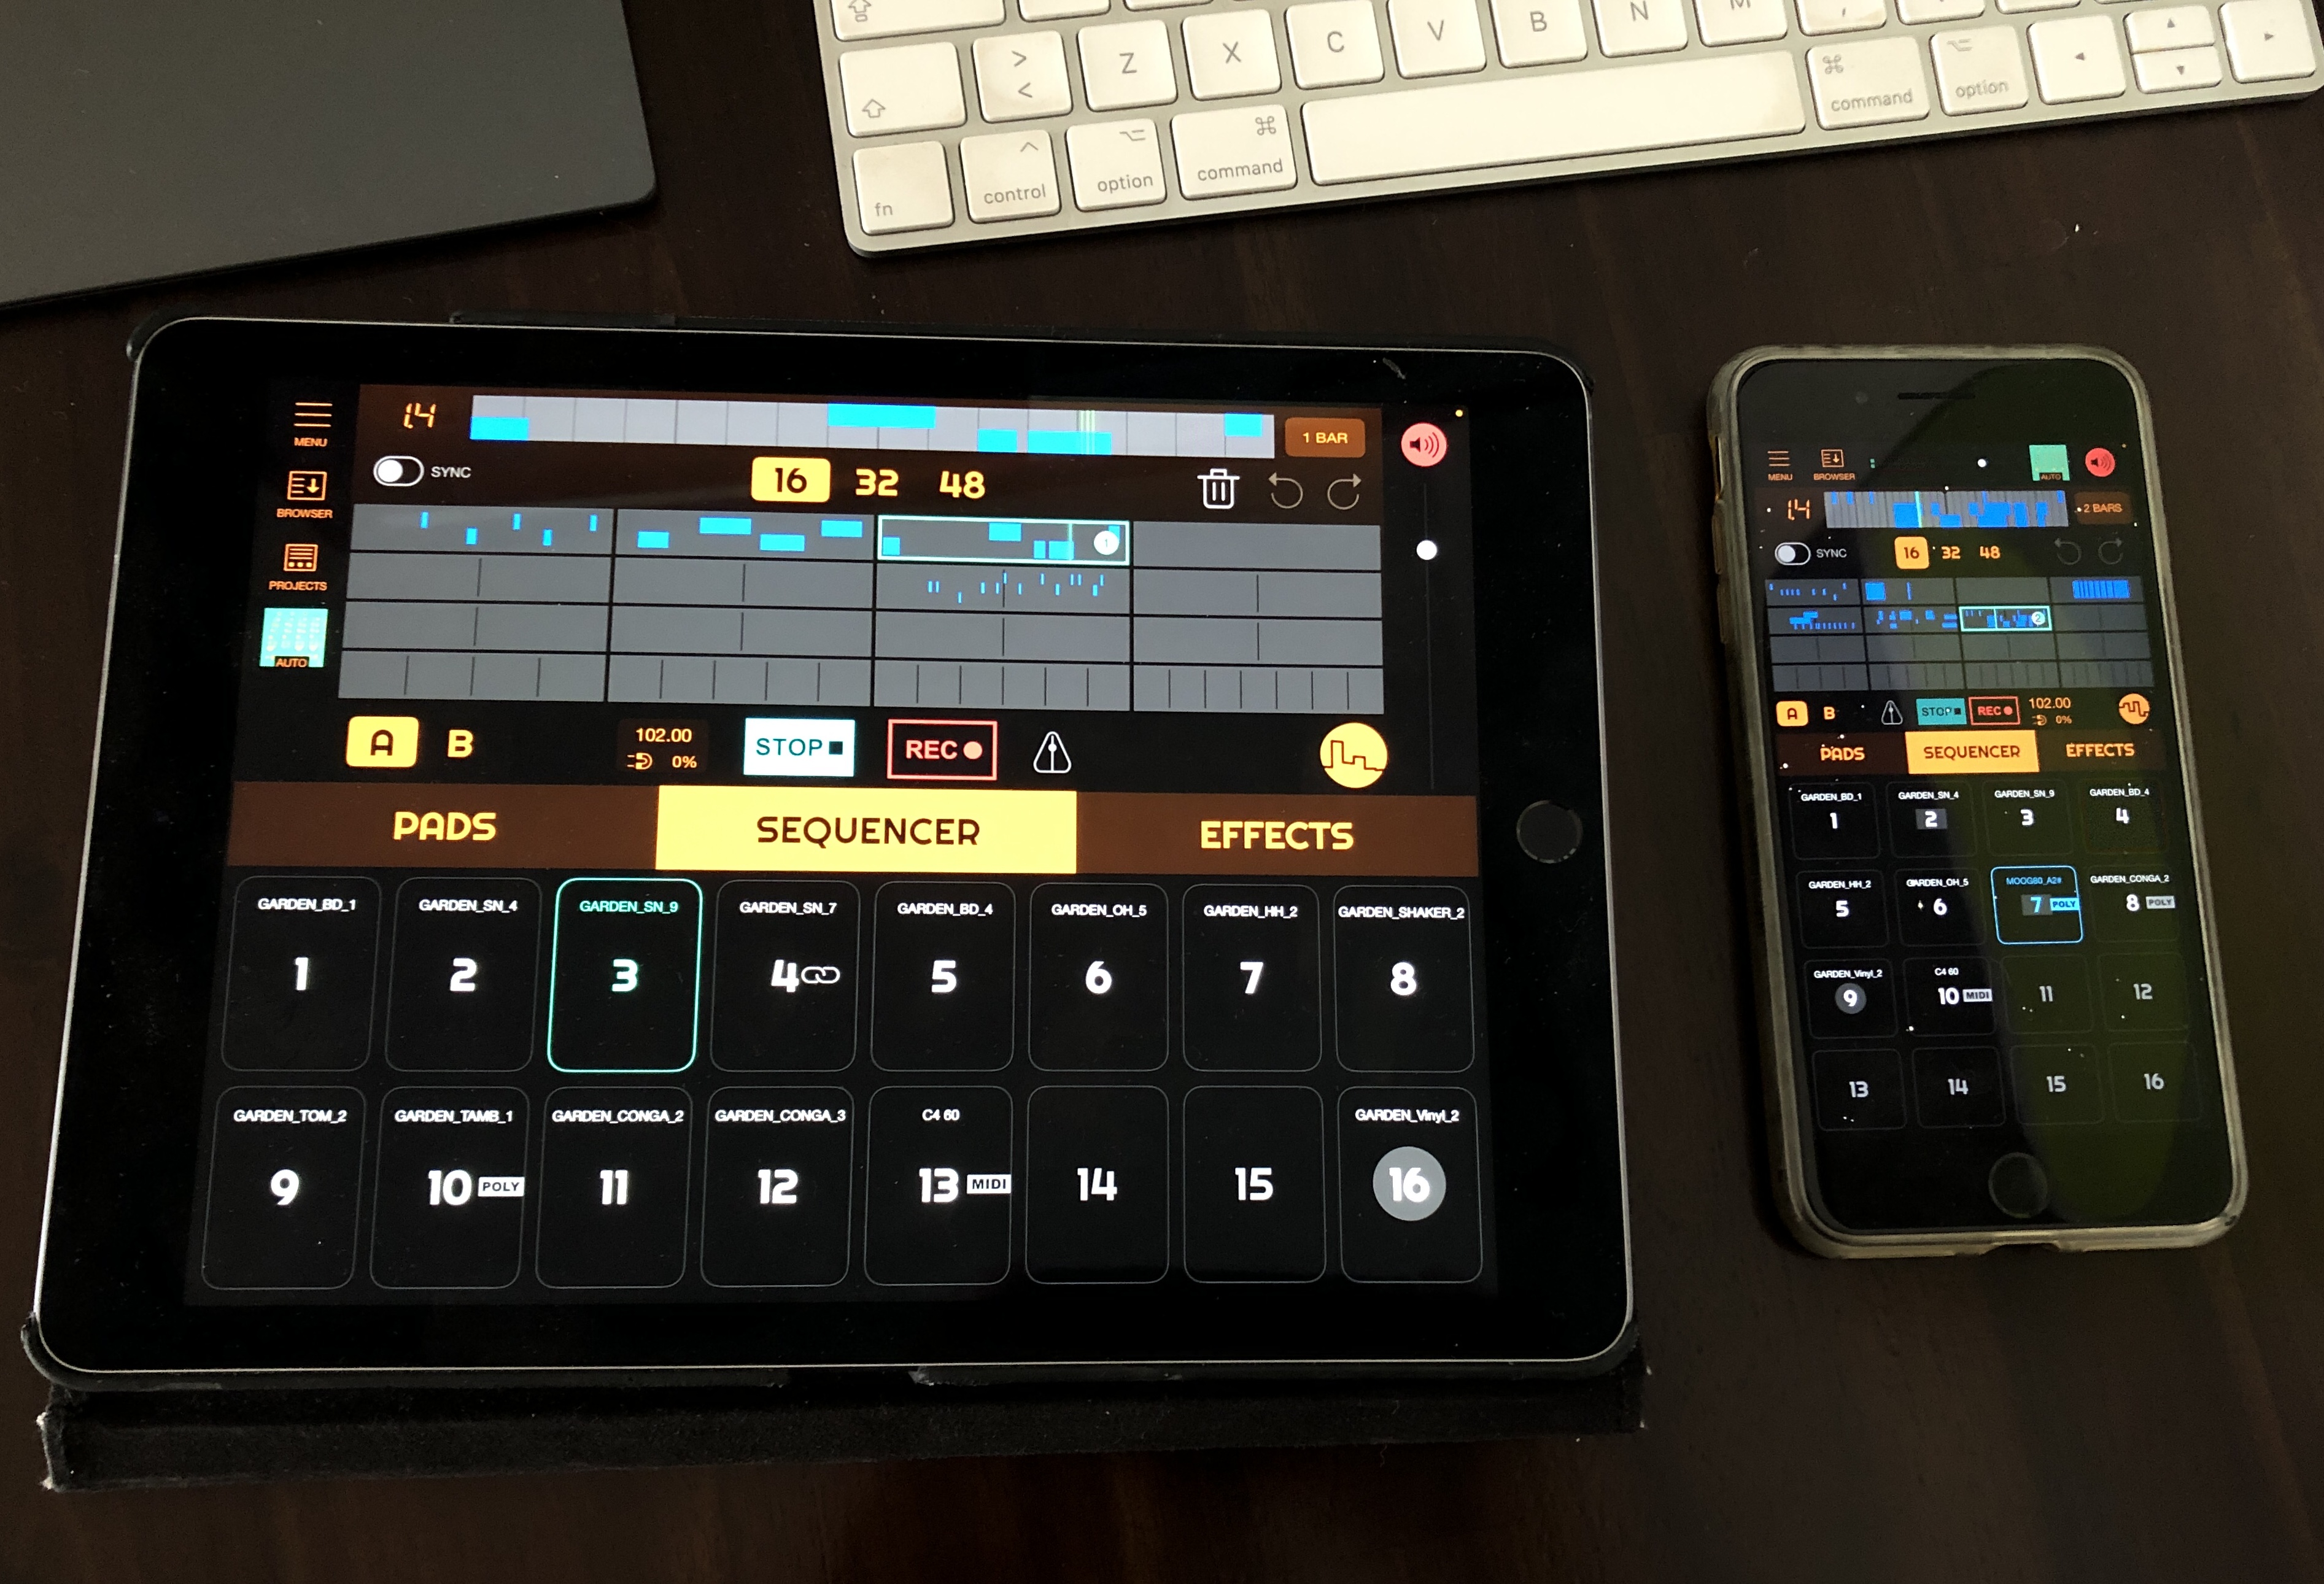
1. PADS
2. WAVEFORM DISPLAY
2.1 WAVE
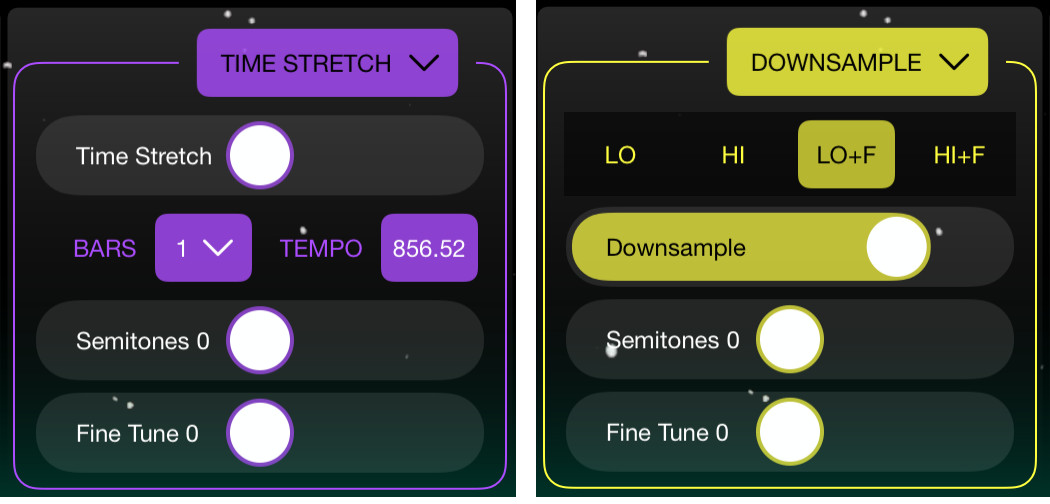
2.2 ADJUSTS
2.3 X/Y
2.4 PIANO
3. BROWSER
4. MEMORIZER
5. POLYPHONIC PADS
6. AUDIO UNIT PADS
7. MIDI OUT PADS
8. MIXER & BUSSES
9. MIDI IN
10. EFFECTS
11. SIDECHAIN COMPRESSION
12. LOSSLESS SCREEN RECORDING
13. CONFIGURATION
14. SONG SETTINGS
15. ABLETON LINK
1. PADS
Drag on pads to retrigger:
Pitch can go up/down when retrigger:
2. WAVEFORM DISPLAY
WAVE
Use the waveform area to apply zoom and pan the waveform, use one finger up or down to zoom.
Use the small orange triangles to modify the selection bounds.
Tap on waveform's name to rename it.


ADJUSTS
Set sample parameters, apply sample reduction, and filter:
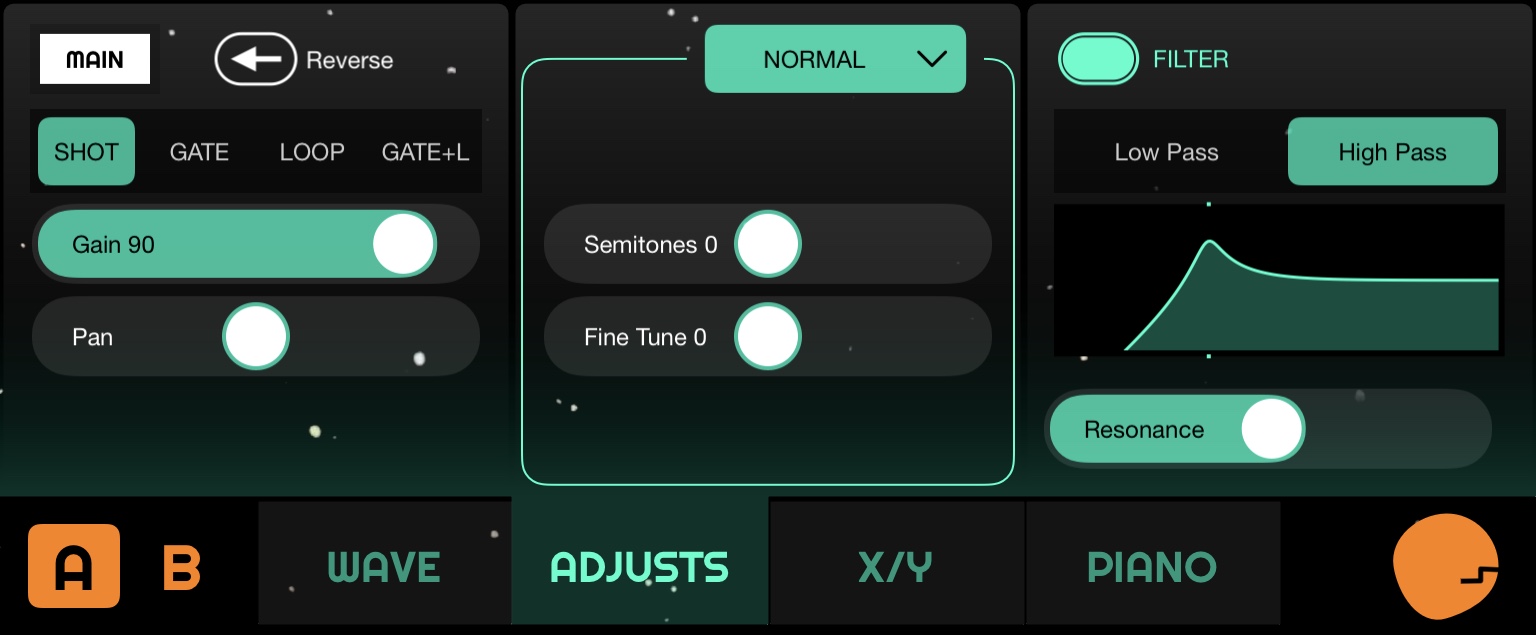
There are three operation modes, NORMAL, TIME STRETCH and DOWNSAMPLE.
X/Y
Set pad triggering parameters:
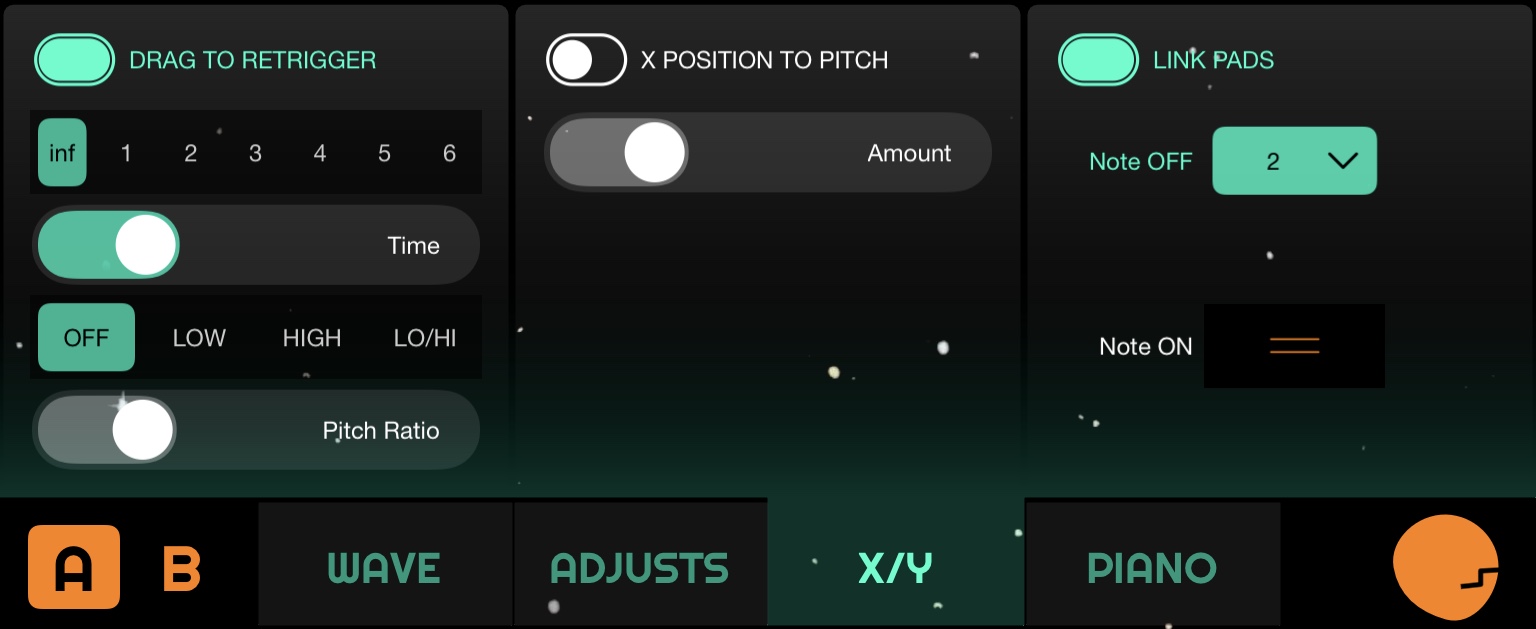
DRAG TO RETRIGGER:
Dragging over pads can retrigger the pad sound, these retriggering can be adjusted:
- Set the maximun retrigger number, from infinite to 6.
- Set the retrigger distance with 'Time' slider, lower values will retrigger fast.
PITCH RATIO:
Change the pitch with next retrigger, use the slider 'Pitch Ratio' to select the amount of pitch change.
OFF: Retrigger with the original pitch,
LOW: Retrigger and pitch down.
HIGH: Retrigger and pitch up.
LO/HI retrigger pitch down when drag to left and pitch up when drag to right.
X POSITION TO PITCH:
Tapping on the x-center of the padplay sample with original pitch, tap left play with pitch down and right play with pitch up. Use the slider to adjust the amount of pitch change.
LINK PADS:
Note OFF groups: Asign a pad to a 'Note Off group', only one pad in a group can sound, other pads in group will be muted when a new one is played.
Note ON link: Trigger a 'slave' pad when this pad is played, you can play two pads simultaneously. Drag from the 2 lines icon to the destination pad. A 'link' symbol will appear inside the source pad.
3. BROWSER
BUILT-IN browser: A selection of samples asorted in several libraries ready to use.
FILES browser: Use the 'Files' app to select a FOLDER as a base location, audio files and folders inside this base location will be displayed.
Use the 2 lines icon to drag samples:
4. MEMORIZER
Pads events are always being recorded in the 'Memorizer', here you can select recently played parts, choose its BAR duration, and save it inside a pattern slot.

Select maximun number of visible events, usually 50 events is enough to manage latest played patterns, choose a greater number if you want recover older events.
Use one finger up or down to zoom in and out.
Drag over blue dotted line to select events. Snap to events is available.
Use the PLAY/PAUSE button to preview the selection.
'MAKE PATTERN SEQUENCE' to save into the selected pattern slot. You can change the song tempo to match this new sequence.
Yellow events are notes played by tapping, blue events are notes played from the sequencer, when main sequencer is playing notes the 'Memorizer' store this events mixed with notes played by the user.
5. POLYPHONIC PADS
Pads can be converted to polyphonic (pads are monophonic by default).
Load a piano-like sample into a pad, go to 'MENU/PADS/TURN POLYPHONIC', now you can play chords!
Polyphonic pads can adjust the RELEASE of the sample.
Polyphonic pads have polyphonic sequences, you can expand polyphonic tracks inside the events editor into a classic polyphonic piano roll.
Empty pads can´t be converted to polyphonic, try loading the sample first and then turn to polyphonic.
6. AUDIO UNIT INSTRUMENT PADS
Pads can be converted to Audio Unit Instruments. AU instruments can be played from built-in piano or from a MIDI keyboard using 'CAPTURE MIDI'.
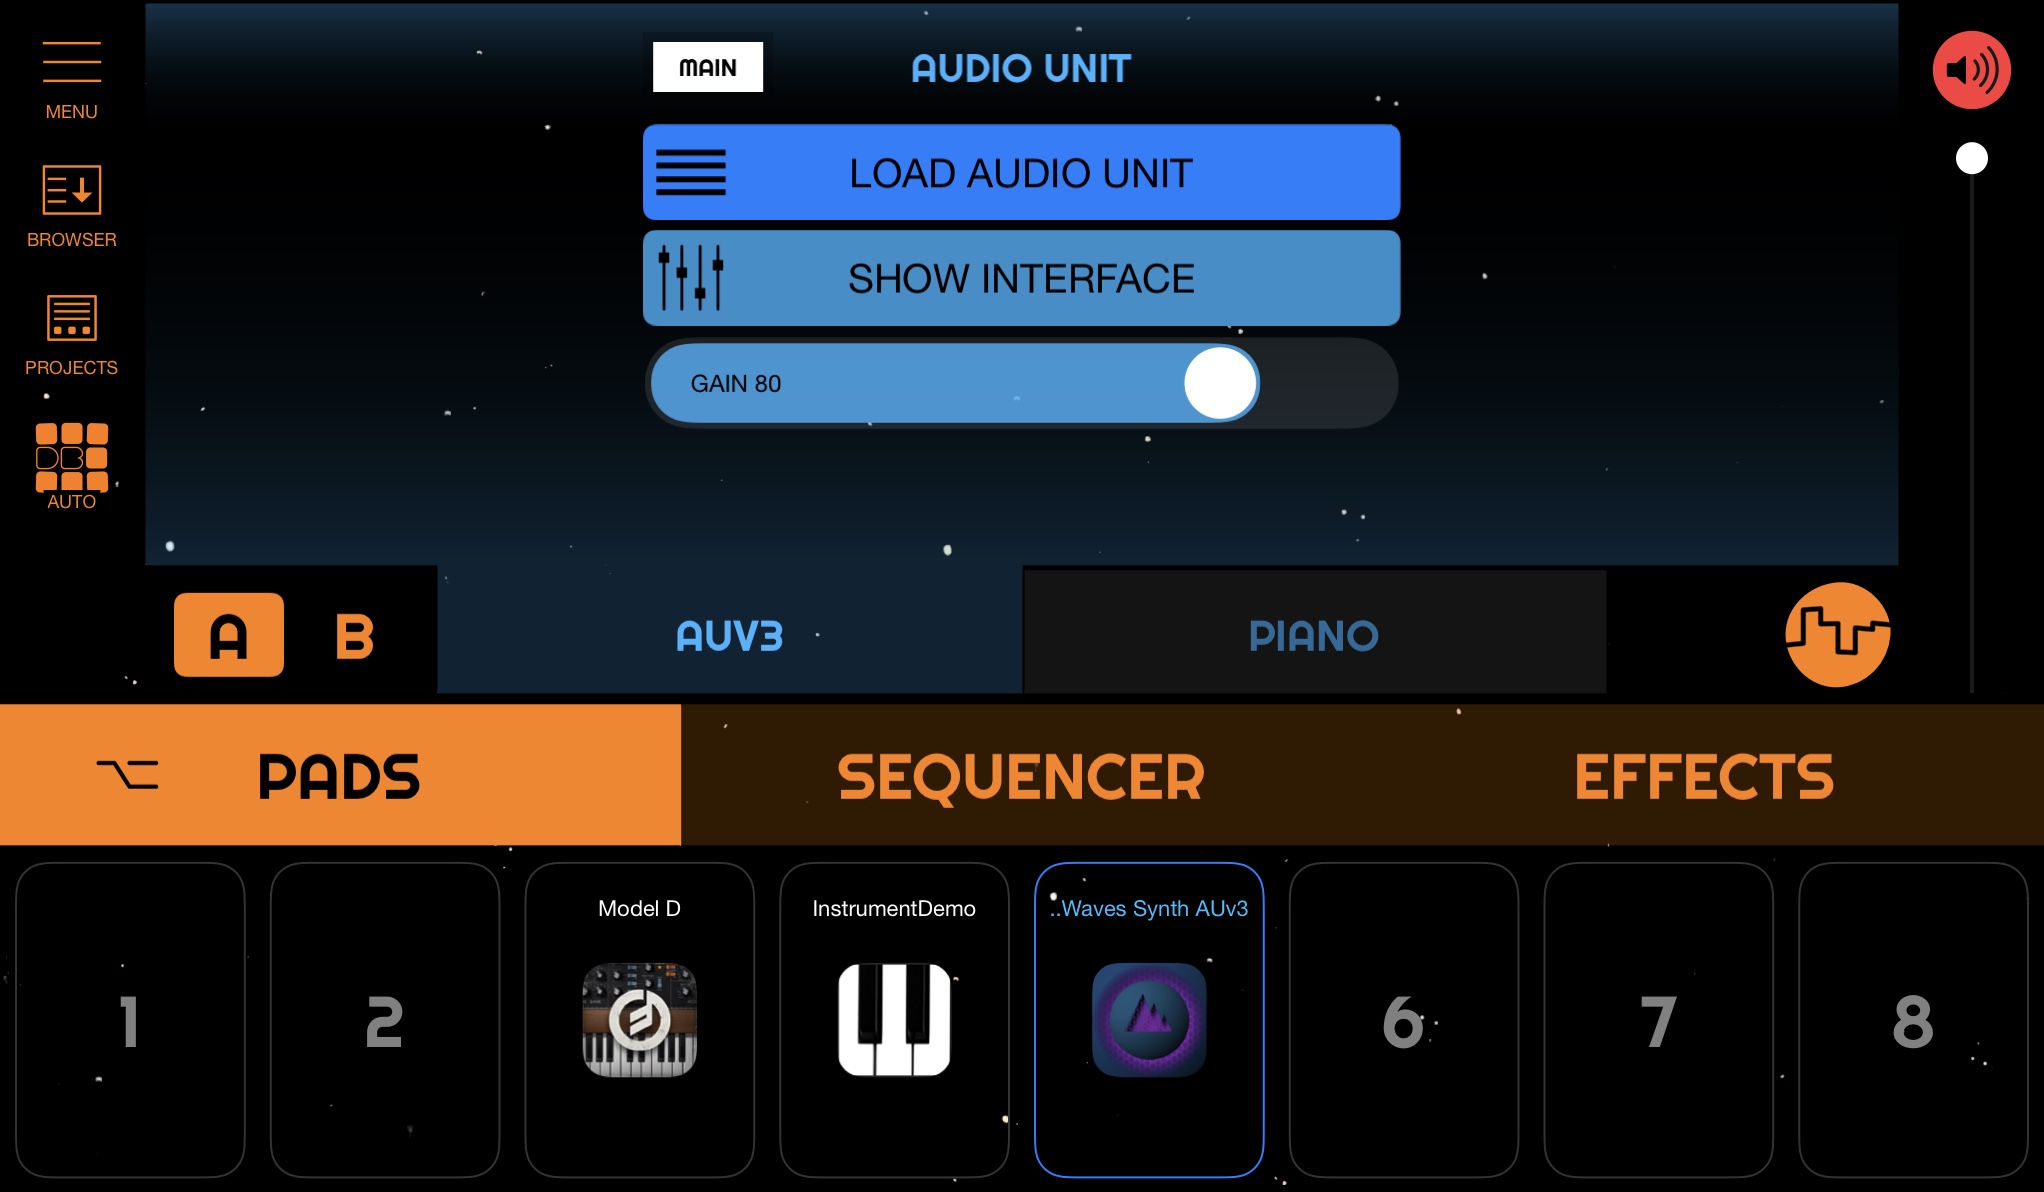
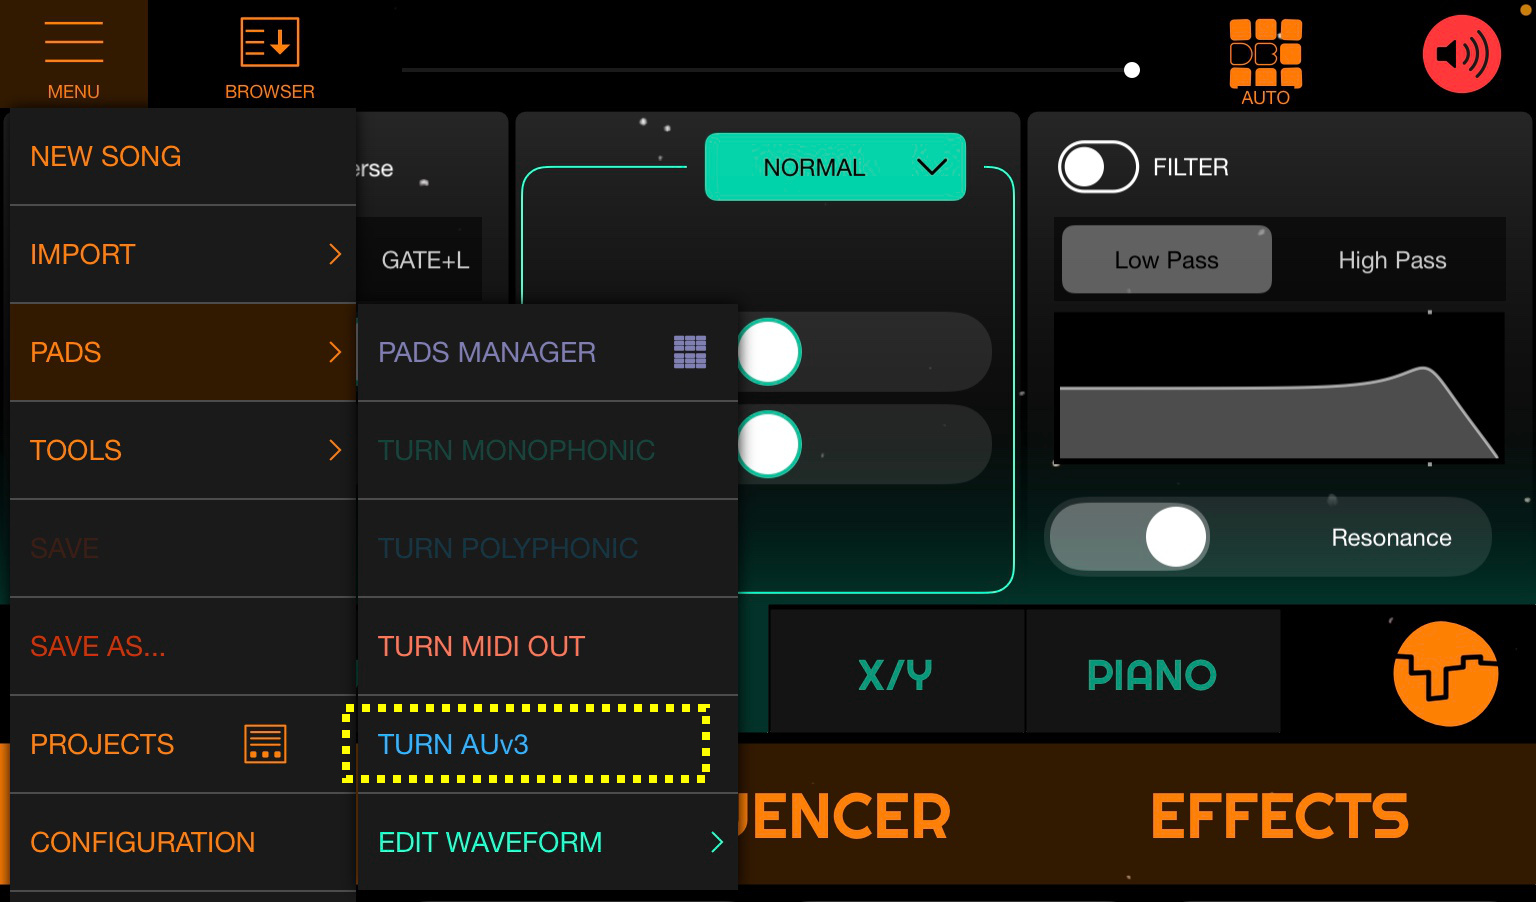
Before loading a new AU instrument a pad should be converted to AUv3 pad, use the menu 'MENU/PADS/TURN AUv3'
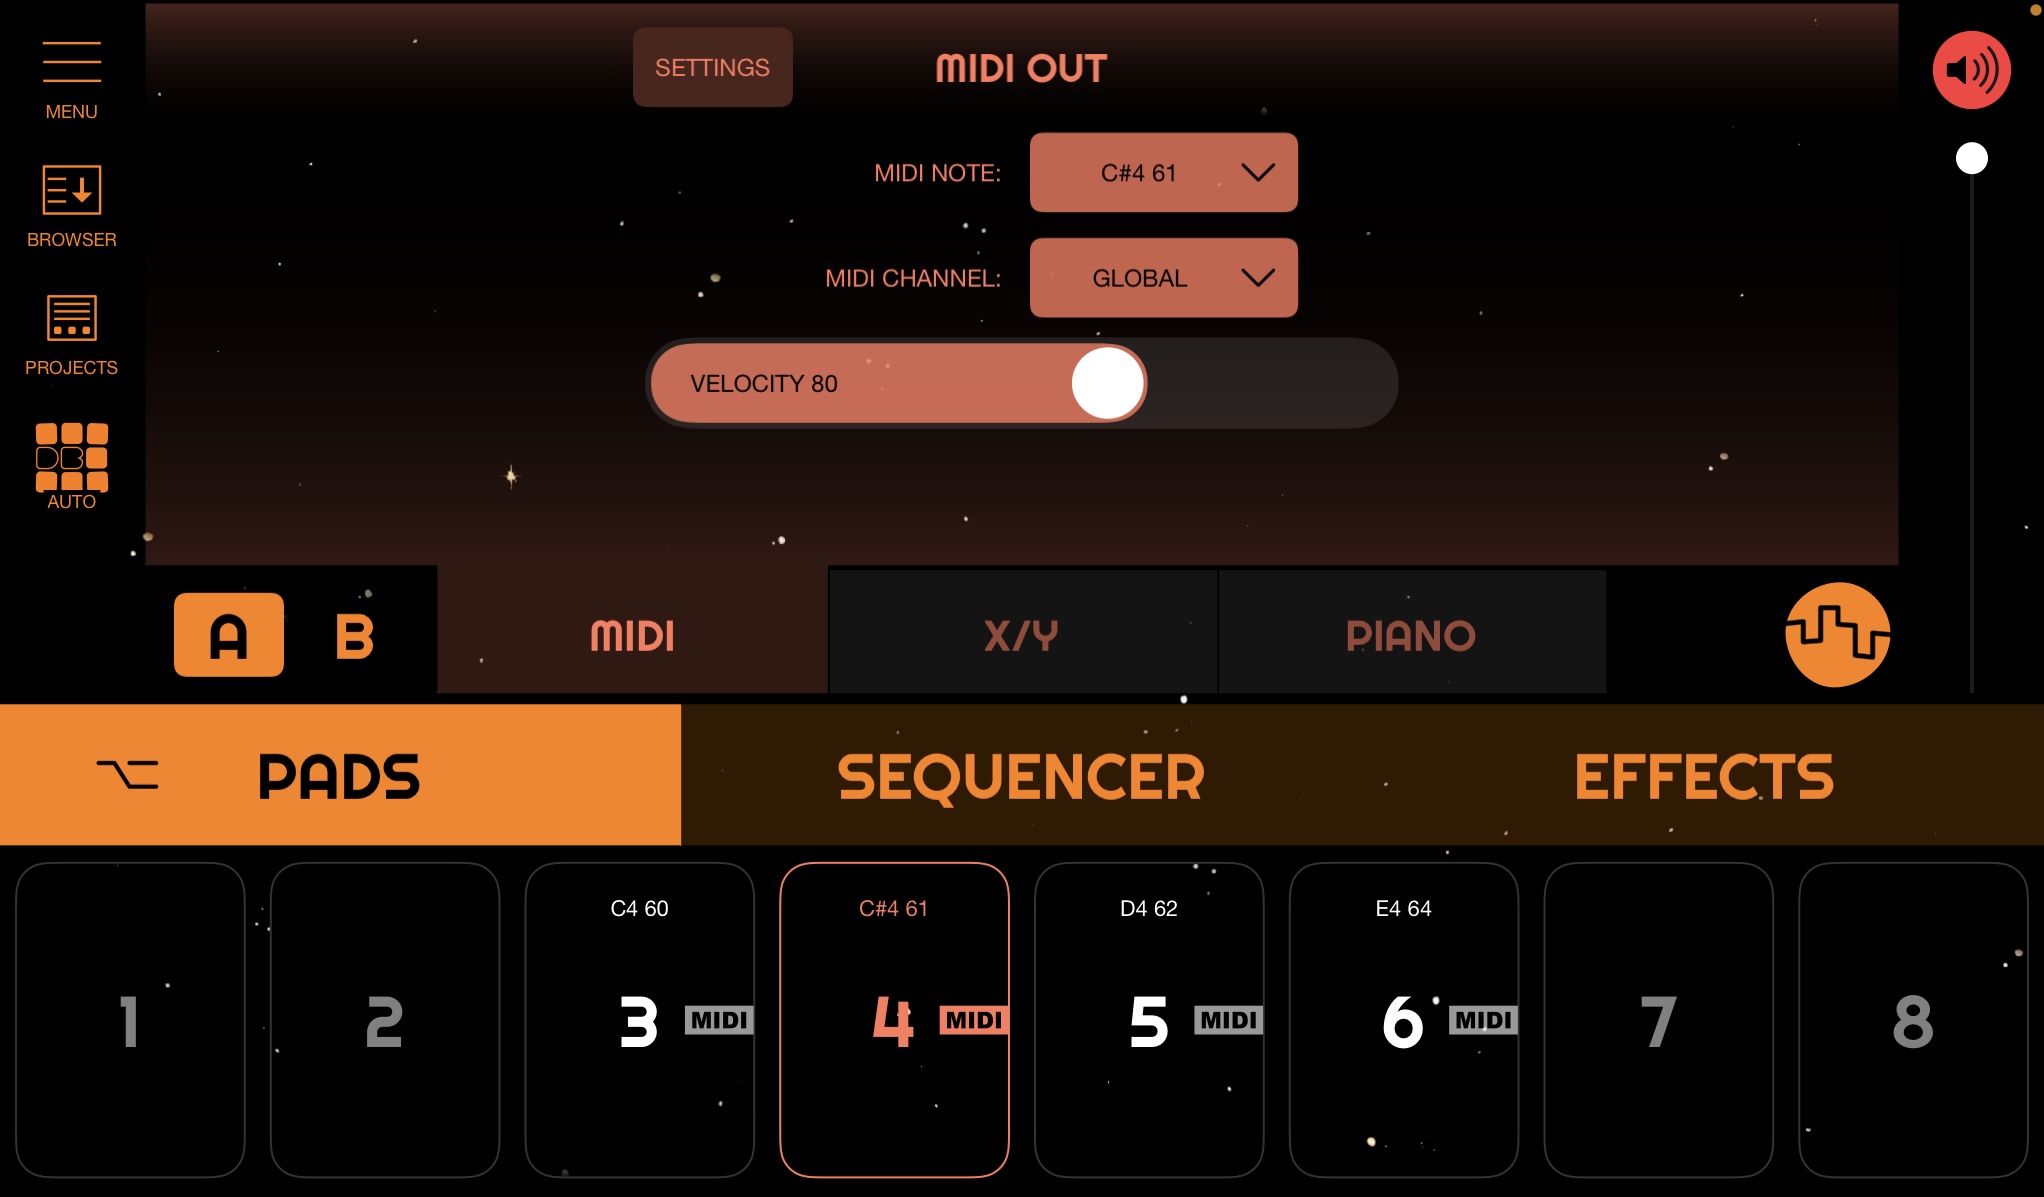
7. MIDI OUT PADS
Pads can be converted to MIDI OUT pads. Go to 'MENU/PADS/TURN MIDI OUT'.
There are two common scenarios for using MIDI OUT:
1 - Set up several pads on the same MIDI channel to sequence an external drum machine, one pad for each individual drum machine sound, the pad must be configured to send the proper note to trigger that sound.
2 - Set a pad on the desired midi channel to sequence a external synthetizer.(The pad MIDI NOTE should be configured to default: C4 60)
8. BUSSES and MIXER
There are 4 BUSSES. Pads can be assigned to BUS 1 to 4 or MAIN channels, this allow pads groups and applying effects to a individual pad or group of pads.
Changing a pad BUS:
1 - Go to 'MENU/TOOLS/MIXER' to open the mixer. TAP and HOLD inside orange tab*, it turns purple, drag a pad over a BUS while tab is purple.
2 - When the mixer is not visible, go to PADS main section, TAP and HOLD 'PADS' tab, it turns purple, drag a pad, mixer is now visible while you hold the 'PADS' tab, drag and drop a pad over a BUS.
3 - Inside pad 'ADJUSTS' panel.

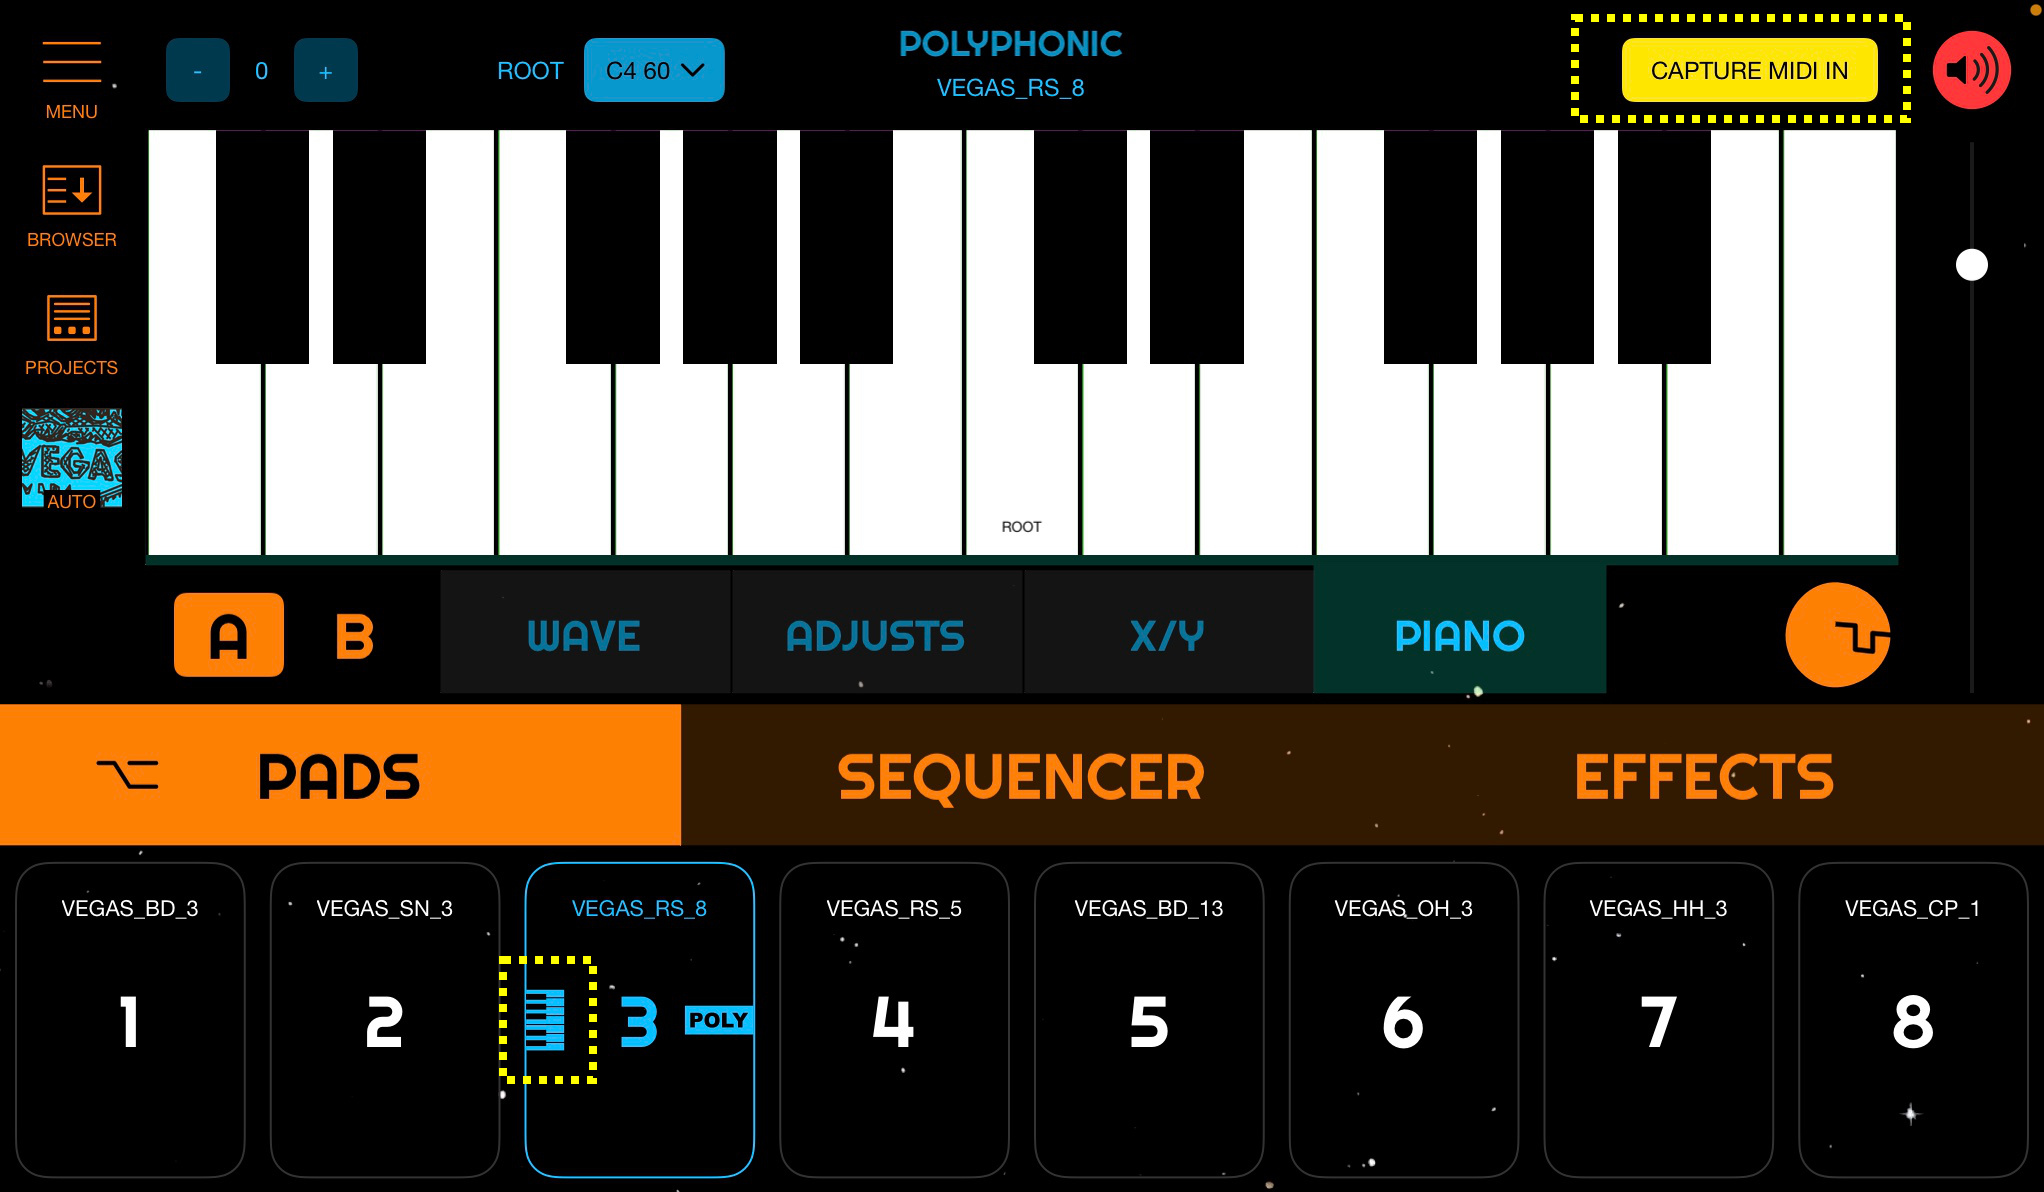
9. CAPTURE MIDI INPUT
Polyphonic, AUv3 and MIDI OUT pads can capture the MIDI INPUT, when the MIDI INPUT is captured by a pad, midi notes are passed to this individual pad, allowing to play melodies and chords.
Only one pad can capture MIDI at a time. If a pad is capturing MIDI, a small keyboard icon is displayed inside the pad.
10. EFFECTS MANAGER
Effects can be reordered. There are 12 effects availables, only 8 can be active:
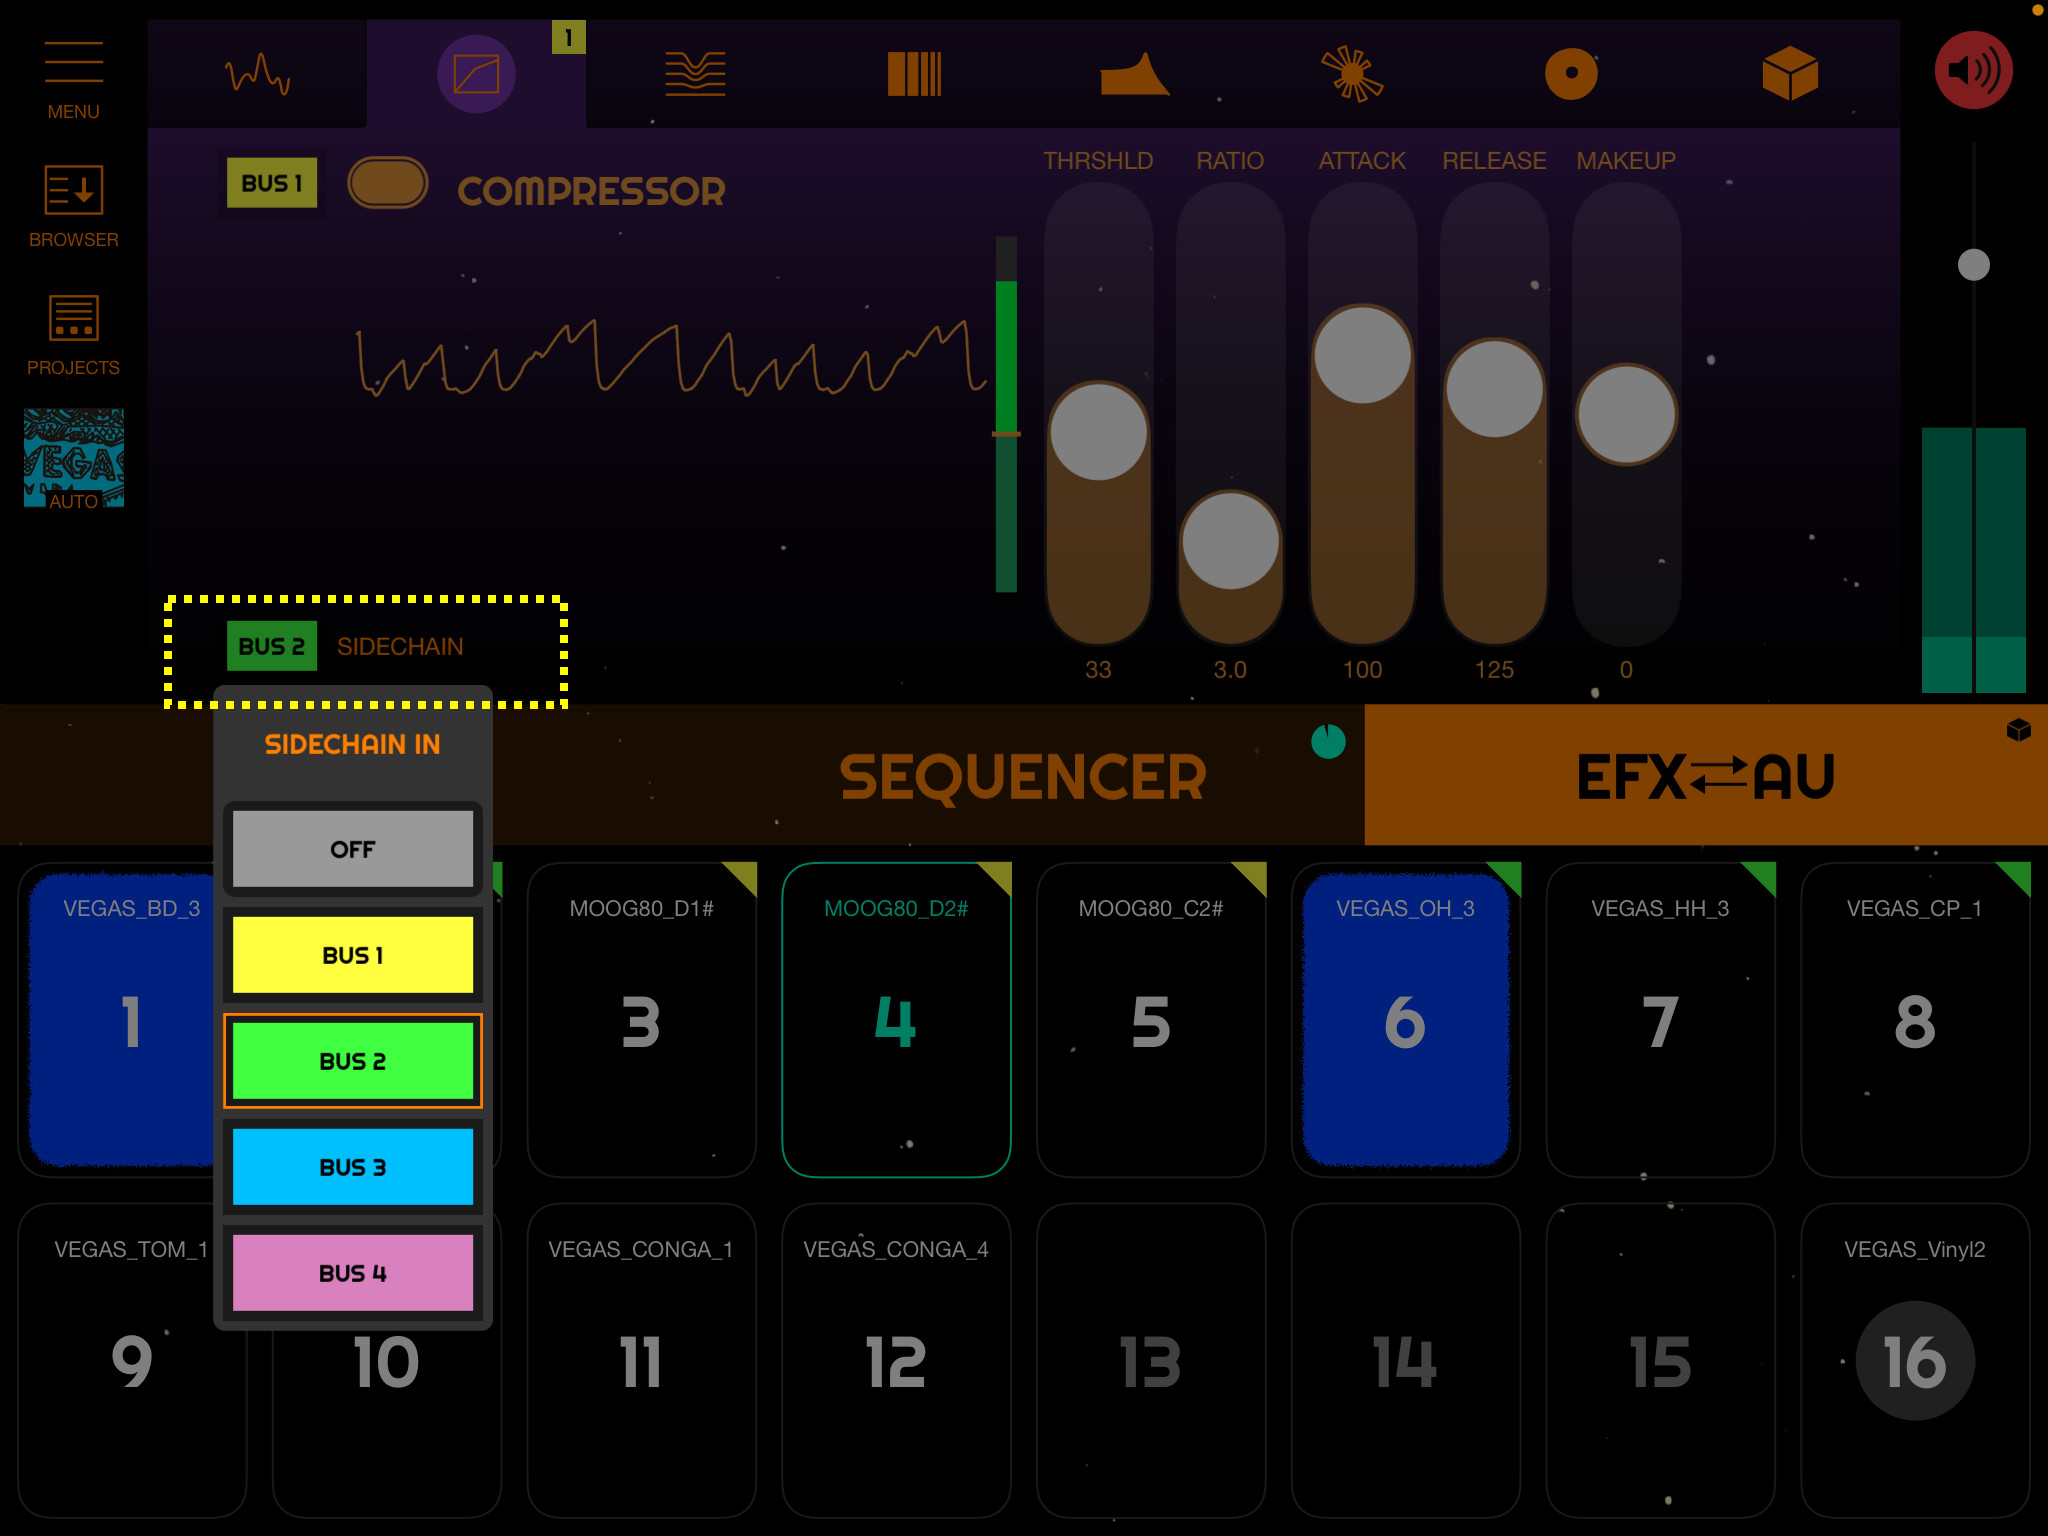
11. SIDECHAIN COMPRESSION
Built-In compressor has a sidechain input.
In order to use it you need to asign some pads or instruments to one of the MIXER BUSSES, and then select this BUS as the sidechain input.
For example, asign some drum pads to BUS 1, asign some bass pads to BUS 2. Use BUS 2 as normal input in the compressor, and BUS 1 as the sidechain input. Now the drums will trig the compressor and the compression is applied to the bass.
12. SCREEN AUDIO RECORDING
Record lossless device's internal audio.
All recording process is managed by iOS, the button to stop the recording is the same used in a iOS screen capture, a red botton at top.
The capture also can be stopped from Dawnbeat. Next you can see a video showing Screen Audio Recording and the two methods availables to stop the capture.
13. CONFIGURATION
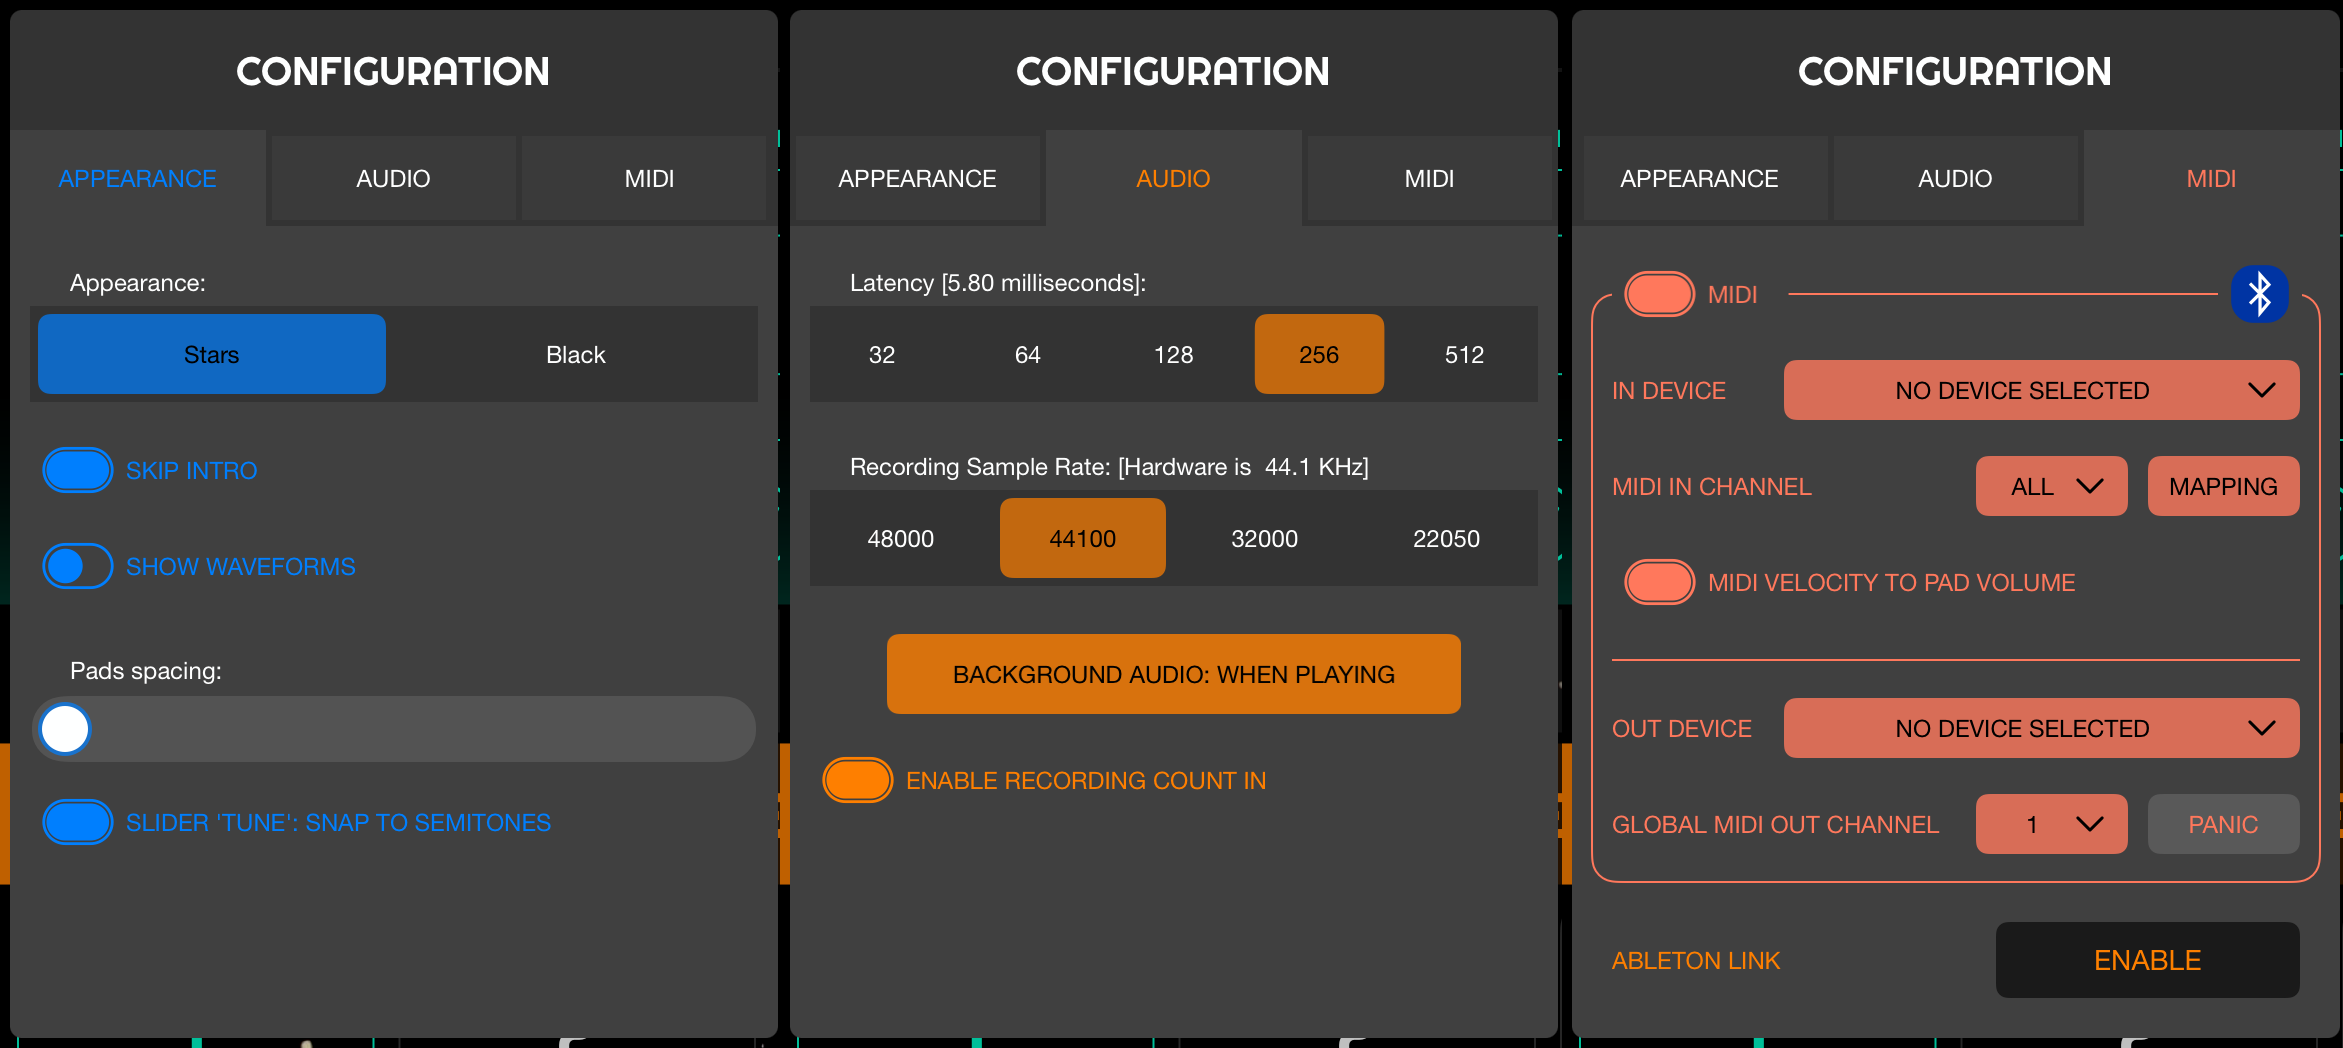
APPEARANCE
- SKIN: Change global appearance.
- SKIP INTRO: Skip intro animation.
- SHOW WAVEFORMS: Show waveform isnide pad buttons.
- PADS SPACING: (iPAD) Reduce pads size.
- GRID:(iPhone)
- SLIDER 'TUNE' SNAP TO SEMITONES: 'TUNE' slider inside PAD adusts can be switched between continuos or snap to semitones.
AUDIO
- LATENCY: Select the audio buffer size, small values reduce the pads lag but increase CPU load. IF YOU ARE LISTENING GLITCHES OR AUDIO NOISES INCREASE THIS VALUE.
- RECORDING SAMPLE RATE: The sample rate used for final recordings. (Top-right button).
- BACKGROUND AUDIO: Enable Dawnbeat running in background. There are three modes:
NEVER: No background audio.
WHEN PLAYING: App run in background only if sequencer is playing. This is the recommended mode if you need audio in background.
ALWAYS: App always run in background. This is only useful if you are using external MIDI devices for trigger sounds and you want the app running in background.
- ENABLE RECORDING COUNT IN:
Metronomo count in before recording events start.
MIDI
- DEVICES: Select input and output device, use the bluetooth button to connect wireless MIDI devices.
- INPUT CHANNEL: Input channel can be selected, use ALL to receive in all channels.
- GLOBAL OUTPUT CHANNEL: A global midi out is defined here, besides each individual 'MIDI OUT PAD' can set its own output channel (and MIDI note) inside PAD/ADJUTS. Use 'MIDI OUT PADS' to trigger external drum machines or samplers.
- MIDI VELOCITY TO PAD VOLUME: Pads can ignore velocity to work as old school samplers, or use velovity as note volume.
MIDI IN MAPPING

Map pads to input MIDI notes, use your hardware pad MIDI controller or keyboard to trigger notes.
MIDI maps can be saved.
- AUTOMATIC 'NEXT PAD' SELECTION: When a note is received current pad is lonked with this note number and next pad is selected for receiving a new note number.
14. SONG SETTINGS
Global sample rate can be adjusted for each song:
A thumbnail can be attached to a song, the thumbnail will be displayed in the songs gallery.
15. ABLETON LINK
Link is a technology that keeps devices in time over a local network. Jam with others using multiple devices running Link-enabled software. (Dawnbeat or another Link-enabled apps, iOS, Mac or PC).
Start and stop the session, adjust the tempo and the rest will follow. No MIDI cables needed.
Go to 'MENU/CONFIGURATION/MIDI' to enable/disable Link.
PLAY and RECORD button will change its color and shape when Link is enabled. Link will pause/resume when Dawnbeat is sended to background.